|
Early Access This is an Early Access feature. To enable it for your account, contact your MoEngage Customer Success Manager (CSM) or the Support team. |
Overview
Custom fonts allow you to go beyond standard web-safe fonts and align your email campaigns with your brand's unique visual identity. By integrating custom fonts directly into your MoEngage workspace, you can ensure that your brand's typography is consistently applied across your email communications. This feature is particularly useful for maintaining a cohesive brand experience, enhancing design, and improving the overall professionalism of your messages.
It is important to understand that not all email clients support custom fonts. To address this, MoEngage allows you to specify fallback fonts, ensuring that your emails will still render correctly and maintain readability even if the custom font is not supported by the recipient’s mailbox provider.
Use Cases
Implementing custom fonts is a powerful way to enhance your email marketing strategy. Here are a few use cases of how you can leverage this feature:
- Brand consistency: If your brand uses a specific font on its website, mobile app, or print materials, using the same font in your emails creates a seamless and recognizable experience for your customers. This strengthens brand recall and trust.
- Unique campaigns: For special promotions, holiday campaigns, or new product launches, a custom font can make your message stand out. You can use a selective approach to apply a specific, eye-catching font to a headline or a call-to-action (CTA) to draw attention.
- Thematic design: A custom font can set the tone and mood of a campaign. For a luxury brand, a sophisticated serif font can convey elegance, while a clean, modern sans-serif font might be used by a tech company to reflect innovation and simplicity.
- Enhanced readability: While standard fonts are safe, a custom font can sometimes offer better readability, especially for long-form content like newsletters or articles, as long as it is chosen carefully and tested with a diverse audience.
Configure Custom Fonts
To configure custom fonts, perform the following steps:
- On the left navigation menu in the MoEngage UI, go to Settings > Channels > Email.
- On the following email settings page, click the Font management tab and then click + Add font.
You can configure custom fonts using the following steps:
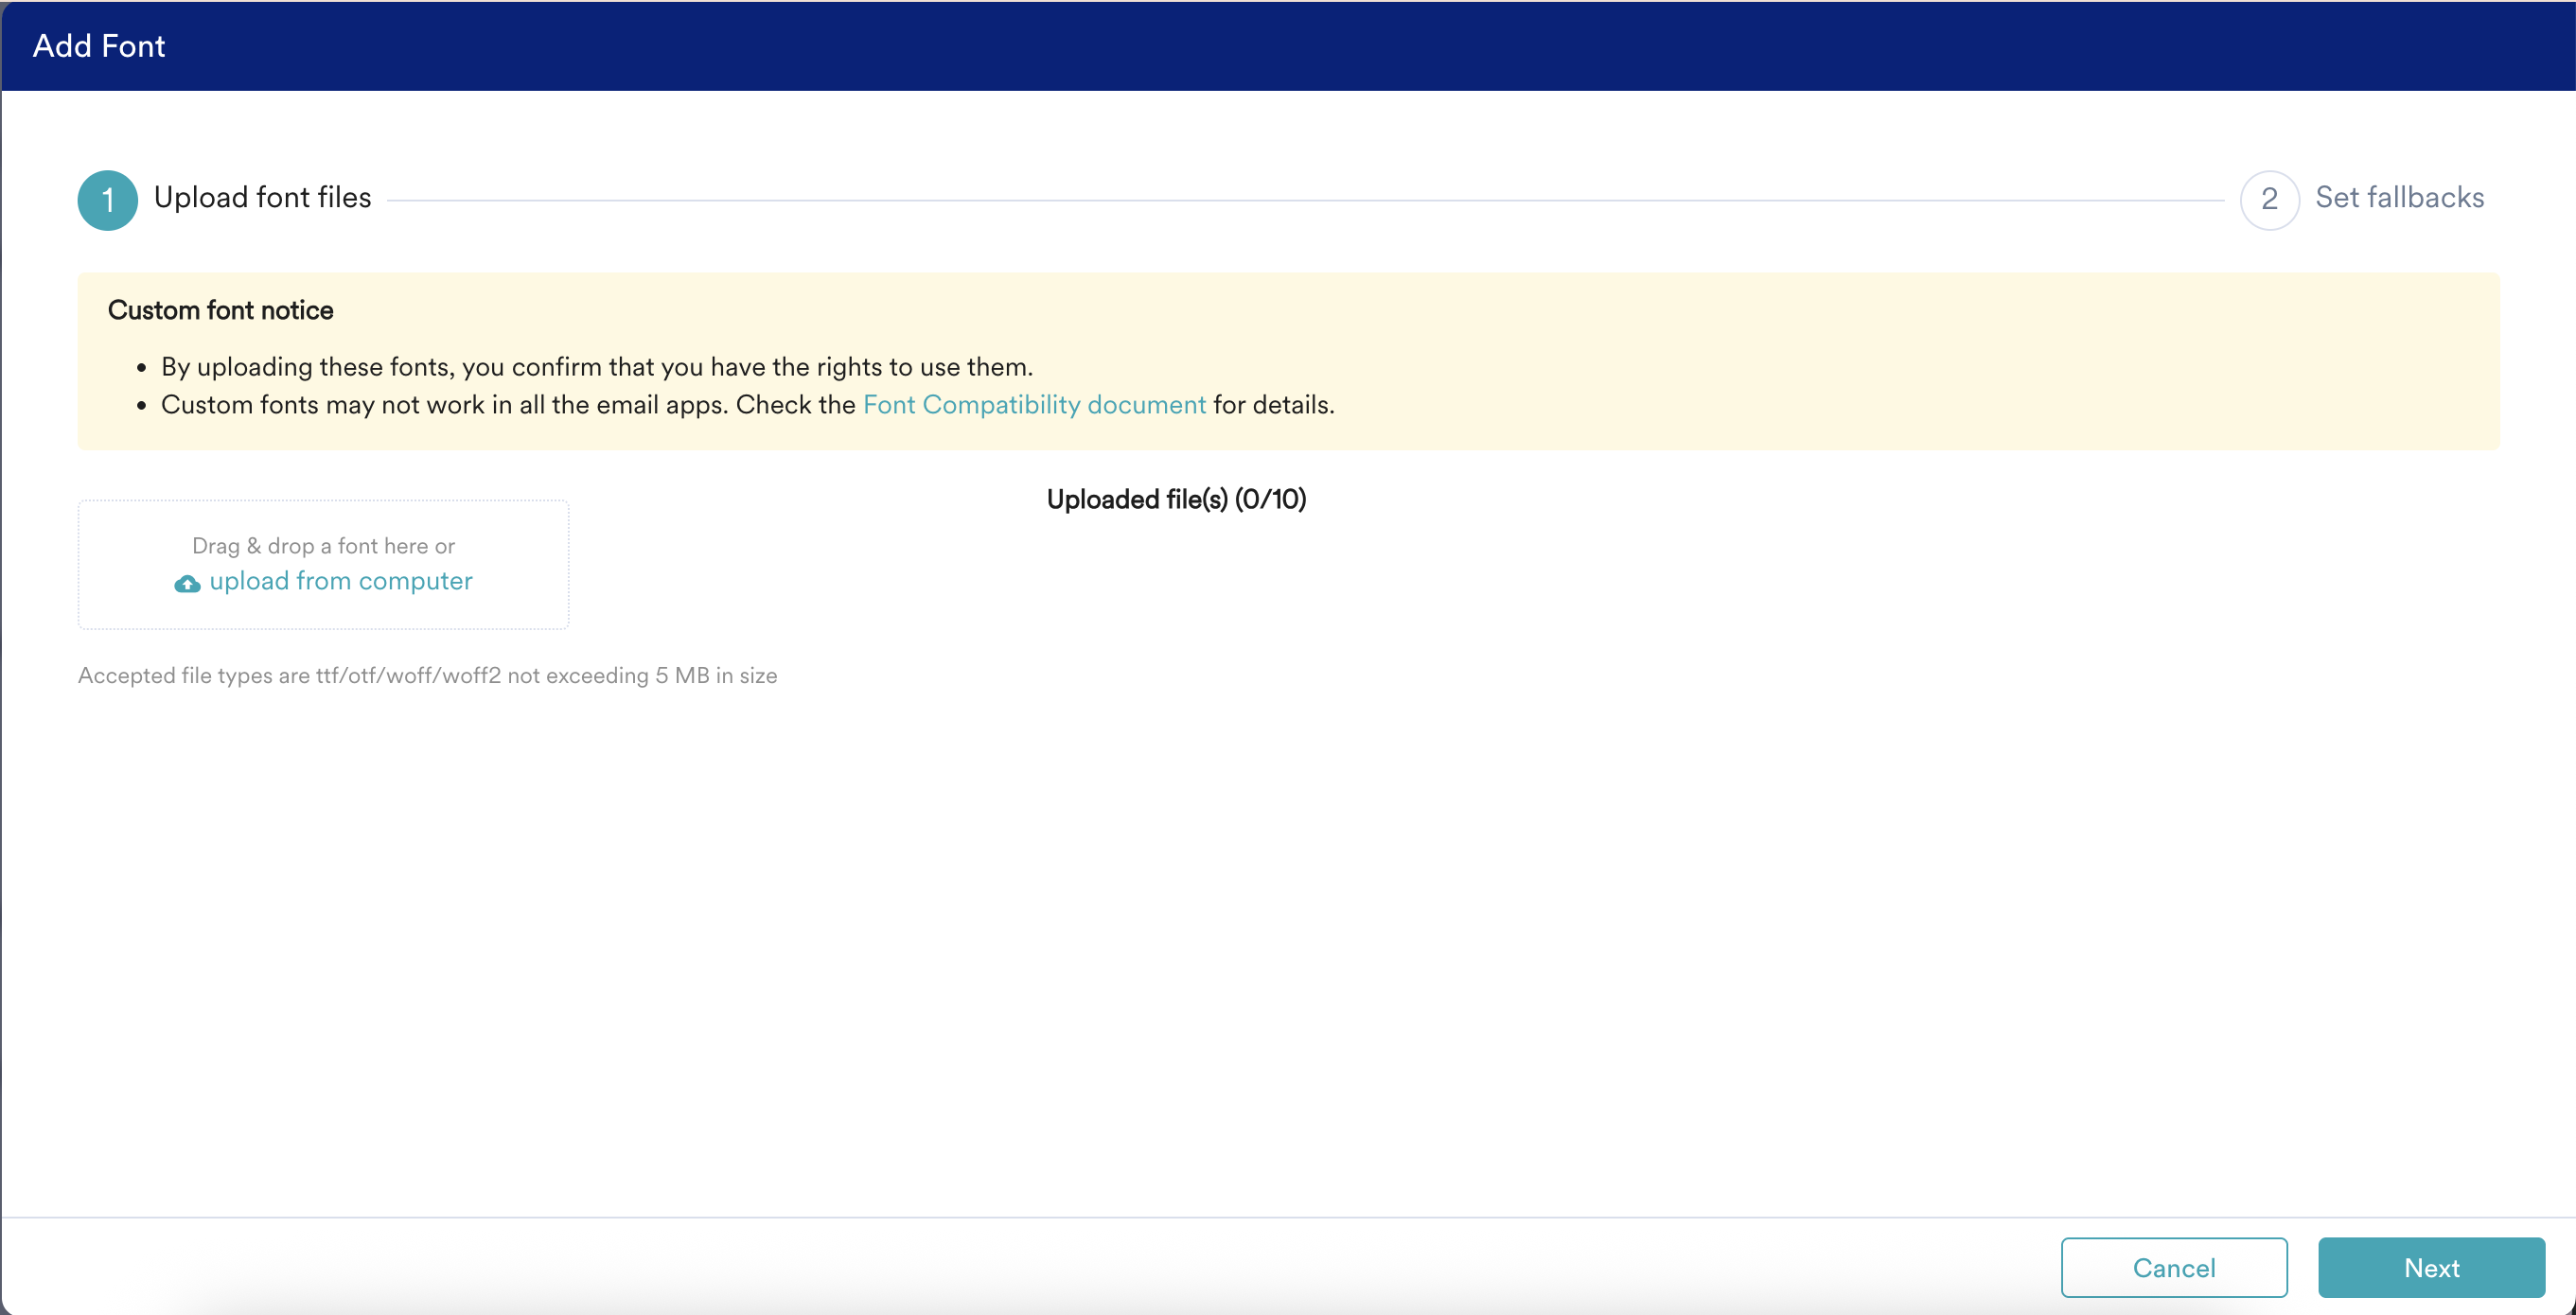
Upload Font Files
| warning |
Warning By uploading the fonts to the MoEngage platform, you confirm that you have the legal right to download, install, and use the fonts. |
- You can upload font files by either dragging and dropping them or by selecting them from your computer. MoEngage accepts files in .ttf, .woff, .woff2, and .otf formats, with a maximum file size of 5 MB.
- After files are uploaded, click Next.
Set Fallbacks
When you choose a custom font for your email campaign, it may not be supported by every recipient's email client. To ensure your email remains readable, you can select up to three fallback fonts. These fonts act as backups and will be used in the order you specify if the custom font cannot be displayed.
MoEngage applies fallback fonts in a specific order:
- Fallback Font 1: The first alternative. If the custom font fails, the email client attempts to display this one.
- Fallback Font 2: The second alternative, used if the first fallback font also fails.
-
Fallback Font 3: The final and most critical option, used when both the fallback fonts fail. You can only select a web-safe font for this position. A web-safe font is a standard font that is pre-installed on virtually all devices, guaranteeing its availability.
By making Fallback Font 3 a web-safe font, you ensure a consistent and readable experience for every recipient, preventing your email from appearing unstyled or messy if the other fonts fail.
After choosing all the fallbacks, click Add Font(s) to list the configured fonts under the Font Management tab.
View Configured Custom Fonts
After the custom fonts are configured, they are listed under the Font Management tab. You can perform the following actions on the custom fonts added:
Copy Font URL
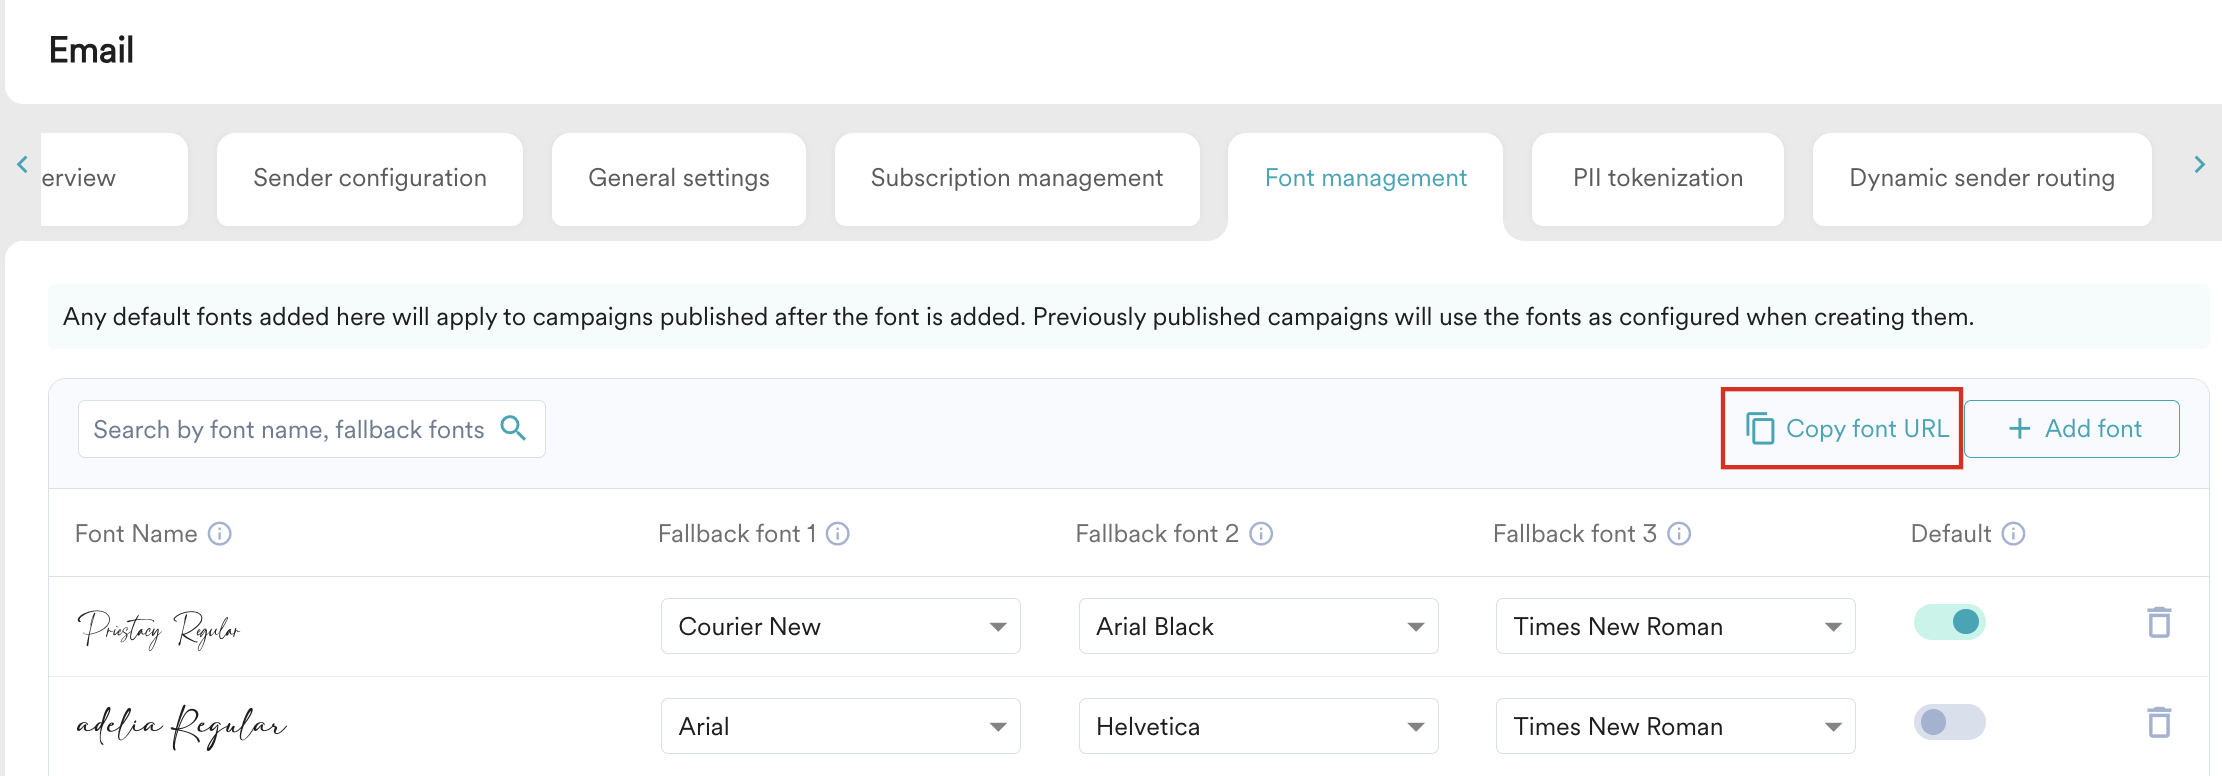
Clicking Copy font URL generates a CSS file that contains all your configured custom fonts. This CSS file can be used in the following scenarios:
- When you create email campaigns using the Custom HTML editor, this CSS file is automatically included in the editor's head tag, so the fonts are ready to use.
- If you disable the Auto-format HTML code toggle in your Email settings and then create email campaigns with the Custom HTML editor, you can paste the font URL into the Custom HTML editor to use the fonts.
Default Font
Turn the Default toggle on to mark a custom font as default; the custom font configured as default is considered default whenever a new email template is created and used wherever a specific default font is not configured. For more information on adding default fonts to an email campaign, refer here.
| info |
Information Marking a custom font as the default applies it to all newly published campaigns. Previously published campaigns retain the fonts configured at the time of their creation. |
Delete Font
To delete a font, perform the following steps:
- Click the delete icon to delete the configured custom fonts.
- In the Delete fonts dialog box that appears, click Delete and Save. Note that deleting a font does not impact any historical or currently created campaigns, drafts, or templates.
- While deleting a fallback font, in the Delete Font dialog box, you can select a replacement font to replace the old fallback font at all the fallback locations.
- While deleting a default font, in the Delete Font dialog box, you can select another font to replace the old default font.
Add Custom Fonts to Email Campaign
While creating email campaigns, you can add the configured fonts to the email campaigns in Step 2: Content, where different editors can be used to create email content. For example, consider the default font configured is Priestacy Regular.
In the Drag and Drop editor:
- You can view this font as the Default font under the Settings tab of the properties panel. Note that changing the default font in the Settings tab does not change the default font configured on the Font Management tab.
- For the Text content element, you can choose Global Font from the dropdown in the toolbar to apply the configured default custom font.
-
For content elements such as Title, Paragraph, Table, List, the Content properties tab displays the Font family as Global Font, where the Global font represents the default custom font.
- Changing the default font automatically updates all instances of the Global font in the drag-and-drop editor.
- You can also override the font for each drag and drop element individually.
In the Custom HTML editor, the configured default font is automatically selected and displayed at the top of the editor.
| info |
Information To ensure your email looks as intended, MoEngage recommends that you validate the design using the Inbox Previews feature, which shows how your email renders on different platforms. |