Overview
MoEngage allows customers to import users and events through files stored inside S3 Buckets.
Types of Imports
MoEngage can import the following from your S3 buckets:
- Registered Users: Users who are already registered on MoEngage.
- Anonymous Users: Users who are not yet registered on MoEngage.
- Events (standard and user-defined): MoEngage can import standard events like campaign interaction events and your user-defined events.
- Auxiliary Data: Users who are added on a temporary basis.
Prepare the files
For information on supported file types, naming conventions, and file structure, consult the File Imports help documentation. Once your files are prepared, place them in a folder within your S3 bucket
Folder Structure
You must configure the folder path when setting up the import. Place all files into an Amazon S3 Folder.
Note that MoEngage does not look for files inside any sub-folders
Required Access Permissions
You must create a new policy so MoEngage can access your buckets and import files correctly. MoEngage requests the following permissions:
-
s3:Get*- This grants the permissions required to download your files. -
s3:List*- This grants the permissions required to view and list your files.
Create a new policy
To create a new policy, perform the following steps:
- Navigate to the Policies tab in the navigation bar.
- Click Get Started and then click Create Policy.
This allows you to add permissions for your user. - Select Create Your Own Policy.
This gives you limited permissions so MoEngage can only access the bucket that you specify.
Input the code below when creating your own policy. Specify a “Policy Name” of your choice, and input the code below into the “Policy Document” section. Be sure to replace the <INSERTSID> with your Statement ID, <INSERTPOLICYID> with your Policy ID, and <INSERTBUCKETNAME> with your bucket name. Replace the Principal as well (make sure the access key ID and access secret key belong to this user/account).
{
    "Version": "2012-10-17",
    "Id": <INSERTPOLCIYID>,
    "Statement": [
        {
            "Sid": <INSERTSID>,
            "Effect": "Allow",
            "Principal": {
                "AWS": "arn:aws:iam::<ACCOUNTID>:<USER>/<USERNAME>"
            },
            "Action": [
                "s3:Get*",
                "s3:List*"
            ],
            "Resource": [
                "arn:aws:s3:::<INSERTBUCKETNAME>/*",
                "arn:aws:s3:::<INSERTBUCKETNAME>"
            ]
        }
    ]
}
You can find more information about how to create policies here.
Set Up Imports from S3
| info |
Prerequisites Make sure to perform all the steps mentioned in the File Based Imports. |
To set up S3 Imports, perform the following steps:
- On the left navigation menu in the MoEngage dashboard, click Data > Data imports.
- Click + Import in the upper-right corner and select Users or Events to create a new import.
- Click the S3 tile.
- Click Continue.
Step 1: Source and format
In this step, configure the S3 connection and specify the file format. In the Import name box, enter a name for this import to easily identify it on the Imports Dashboard.
Based on the type of import selected, your next steps might vary:
Based on the event you pick, your file names will be different. Your file names must begin with the Event Name of your chosen event. In the Select event list, MoEngage displays the names of all the available events for your app. Some of these events might have different display names and event names. When you hover over an event, MoEngage will show you what the file name it expects for that particular event
For example, the event App/Site Opened will have the value MOE_APP_OPENED, so the file names should begin with MOE_APP_OPENED. For more information, refer to Naming Conventions.
To create a new event, perform the following steps:
- Click the + Create event at the end of the Select event list. The Create new event dialog box is displayed.
- In the Event name box, type a unique name for your event. By default, your Display Name is same as the Event Name.
You can go to the Data Management page to view or edit the generated event and your other MoEngage events.
| info |
Information The newly created events do not appear on the Data Management page until the initial import is successful. |
Add your S3 Credentials
In this first step, Source and format, you must specify MoEngage, which S3 connection to use, and the table from which to import. To get started, provide the following details:
| Field | Description |
|---|---|
| S3 bucket name |
This is the name of your S3 bucket. How to find this: In your AWS Console, go to Amazon S3. Click your bucket from the list, and the name of the bucket is mentioned at the top. You can also find this in your bucket Properties tab. Look at your S3 ARN, the part after Example: |
| S3 access key |
This is the Access Key ID of the account with which you want MoEngage to connect to your bucket. You can either choose to provide the Access Key ID of an existing user (programmatic access or console access) or create a new user with Programmatic Access just for MoEngage. How to find this: In your AWS Console, go to IAM Console >> Users. You can manage your keys for each user here. For an existing user, under the Security credentials tab, scroll down to the Access keys section. Either copy an existing access key or create a new one (recommended). Enter the Access Key ID here. Example: |
| S3 secret key |
AWS provides a pair of Access Key IDs and secret keys for each user. Enter the corresponding Secret Access Key for the Access Key ID of the account above. How to find this: Your Secret Access Key is provided when you make a new Access Key ID. For more information, refer here. Example: |
| Region |
Optionally, you can provide MoEngage with the region in which your bucket is hosted. How to find this: You can find the region of your bucket under the bucket's Properties. For more information, refer here. Example: |
| File Type |
Select the type of file you want to import. MoEngage supports importing the following files:
|
| Folder path |
The path of the folder in which your files are present. MoEngage does not look inside sub-folders. Do not include trailing slashes. Please note that MoEngage does not support root-folders at the moment so ensure that all your files are inside a folder. How to find this: From the list of objects in your S3 bucket, open the folder you to import from. In the Properties tab, look at the folder's S3 URI. Your folder path is the part after In the above example, your folder path is: Example:
|
Is your file encrypted? |
MoEngage supports importing encrypted files. MoEngage currently supports PGP Encryption. For more information, refer to How Does MoEngage Handle PGP Encryption? If you are importing encrypted files, select the checkbox. Note: MoEngage supports file encryption using RSA keys of 1024-bit size. |
| Decryption Key |
If the Is your file encrypted checkbox is selected, MoEngage asks you for a Decryption Key. This is your Private PGP Key. You can generate the PGP keys by yourself or have MoEngage generate them. Example: -----BEGIN PGP PRIVATE KEY BLOCK----- xcMGBGVqq74BCADKpWRLSAdcTtDKpT+LCUCqDoZQ2dlgeBiXNovBVyTPlAOPQSqX bnNGs+U4RpHebjvTxaWCLDBGYOvtZbtv6WvPIF7lzXrIv+DcgLMBQp2b3t+ohRBi 41Ch8CZ04F2lxbVBo -----END PGP PRIVATE KEY BLOCK----- |
| Signing Key |
If a signing key is also configured, the signing key public key must be entered in the Signing key section in the following format. Example: -----BEGIN PGP PUBLIC KEY BLOCK----- xqq74BCADKpWRLSAdcTtD45nl24KpT+LCUCqDoZQ2dlgeBiXNovBVyTPlAOPQSqX -----END PGP PUBLIC KEY BLOCK----- |
| Key passphrase | Enter the passphrase that was generated along with the encryption key pair. |
File Configurations
Select the DateTime format which is in your file name. As per the Naming Conventions, your file name should end with _<date time format>.csv or _<date time format>.json. For more information, refer here to see which DateTime formats that MoEngage supports. The info message will update according to your chosen DateTime format so that you can easily cross-verify if your file names are as per expectations.
After you've configured your S3 Credentials and your file name format, MoEngage tries to connect to your S3 bucket and fetch the most recent file available with the specified format. Ensure you have at least one file available in the specified location otherwise, you cannot continue. After you're ready, click Fetch file(s)* to fetch a recent file.
If your S3 credentials and chosen file format are correct, then MoEngage shows you the preview of the top five rows from a recent file:
These are some common errors that you can encounter while fetching the file from your S3 buckets:
- Given S3 Access Key is not valid: This indicates that your S3 credentials are incorrect. Enter the correct credentials and try to fetch the file again.
- Please check the folder path and try again: This indicates that either your folder path is incorrect or there are no CSV or JSON files present inside the given folder path.
- Found zero data rows in the file: This indicates that the fetched file either contained no rows beyond the header (for CSV files) or was entirely empty (for JSON files). MoEngage expects at least two rows (one header + one data row) for CSV files, or at least one data row for JSON files. For more information, refer to File Structure.
After you are satisfied with the preview of the file, click Next to continue to the mapping step.
Step 2: Import configuration and action
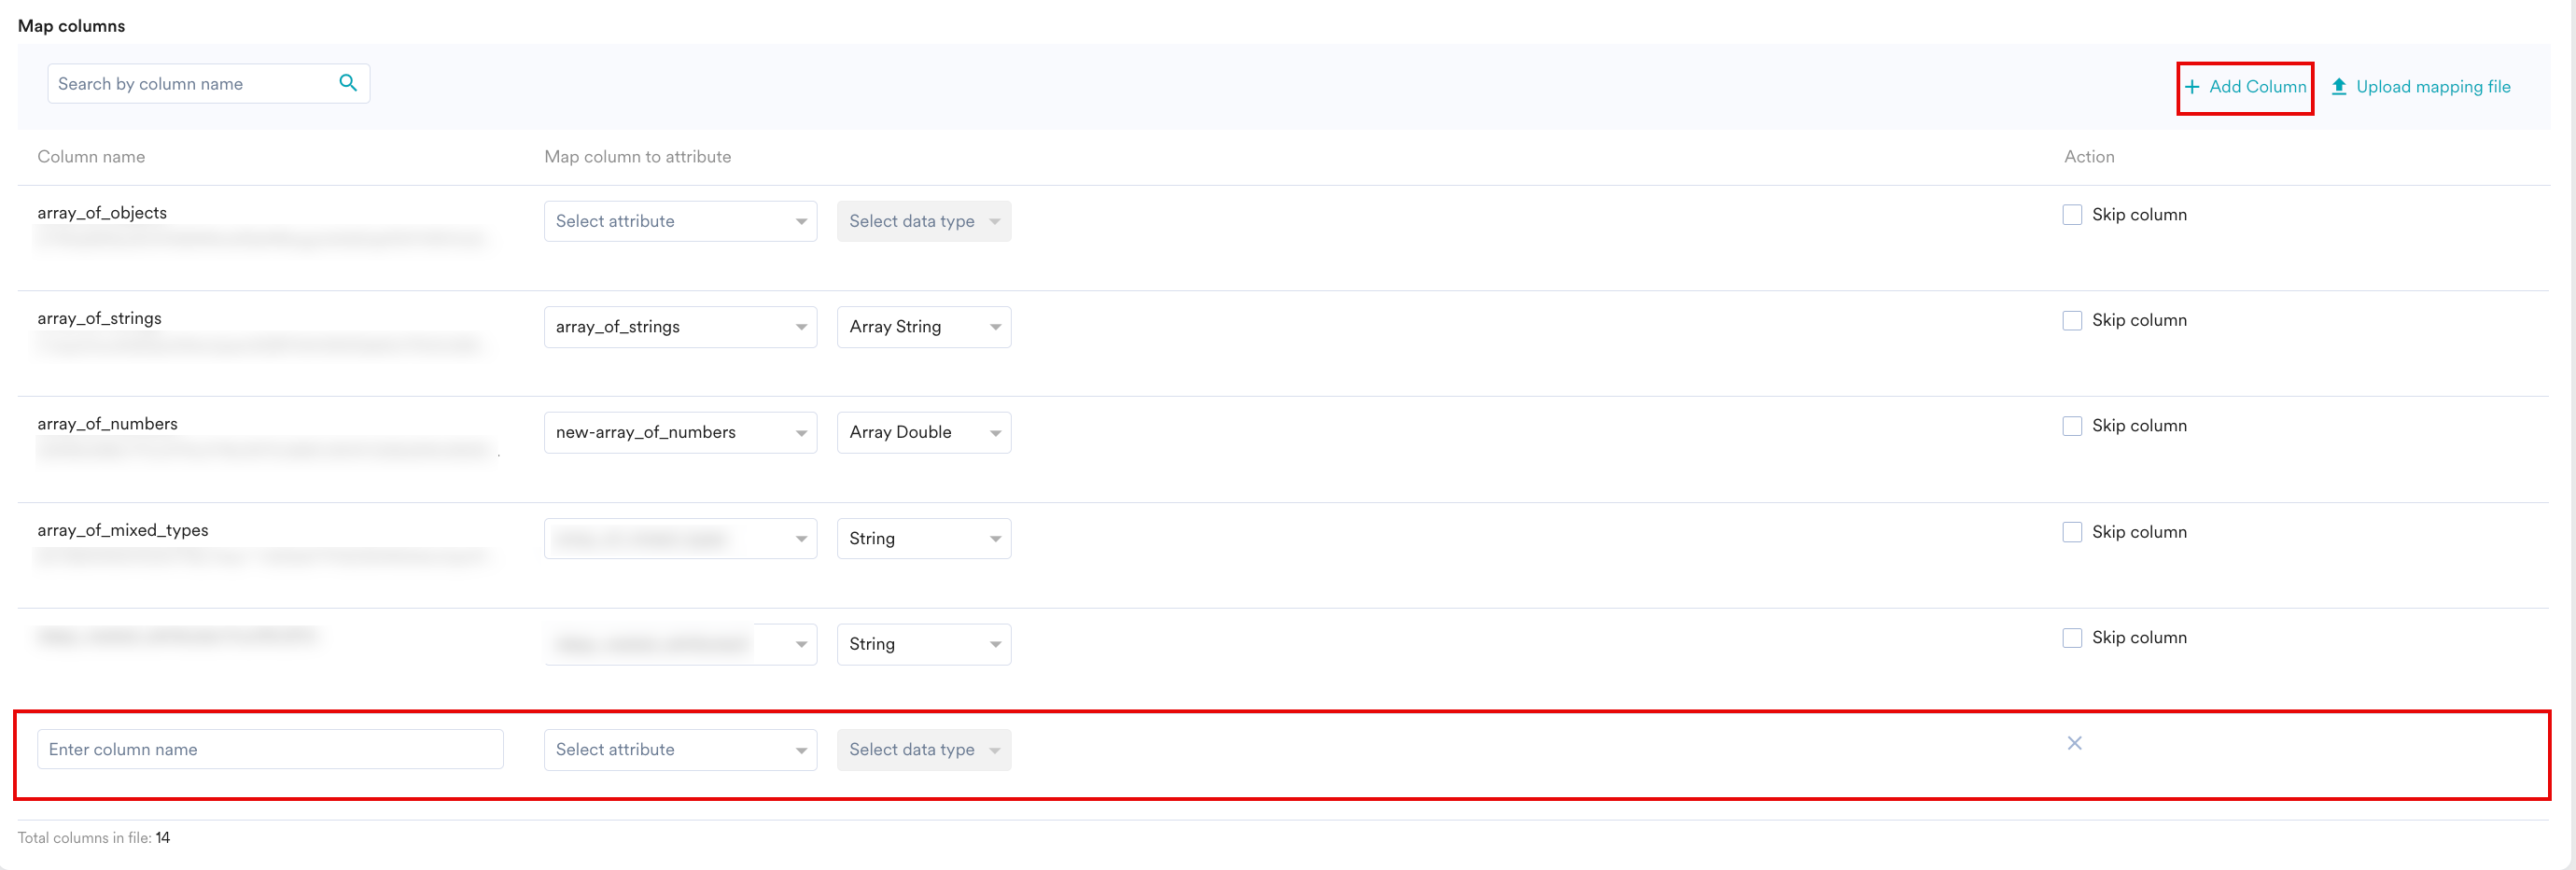
In this step, after configuring the S3 connection and file format, you will map your data columns to MoEngage attributes. The interface will list all columns from your file (derived from the CSV header or JSON keys), allowing you to map each one to its corresponding attribute in MoEngage
In the Map Columns section, you have the following:
- Column name: This is the column name (picked from the first row of the fetched file in the previous step) to be mapped. Below the column name, MoEngage also shows a sample value (picked from the second row of the fetched file in the previous step) for your reference.
- Map column attribute: You must select which MoEngage attribute you want to map the column to. You can also choose to create a new attribute. Some attributes support ingestion from multiple data types, so you need to pick the data type of the column as well. For the "DateTime" columns, you also need to pick the format. For the "DateTime" columns, you also need to pick the format
- Action: You can optionally choose to skip the column. The skipped column will not be imported.
Depending on the type of import, there are a few mandatory mappings required:
User imports
-
Registered Users
- User ID: Your file should mandatorily have a column that contains a unique user identifier (that identifies a user’s account in your system).
-
Anonymous Users
- Anonymous ID: You must mark a column from your file (email, mobile number, etc.) as an identifier of these users.
-
Event imports
- User ID: This column is used to match the users in MoEngage to your files.
-
Event Time: You must map either Event Time (UTC) or Event Time (App Timezone). If you have chosen Event Time (UTC), then the "Event Time" of the imported event will be converted to the timezone chosen in your MoEngage Dashboard settings:
After a mandatory mapping is marked, it reflects against the column name in the mapping table, and you will no longer be able to mark the column as skippable.
You can also create new Object attributes by clicking the + Create new attribute in the Select attribute list under the Map attribute mapping section.
Give your attribute a name and select its Data type. You can edit this as well as existing attributes from the Data Management page. Do note that any new attributes you create now is available in your app after the first successful import.
Add Fields
You can also add fields directly from the dashboard by clicking +Add Column. This creates a new Enter column name at the bottom of the list below where you can enter the attribute mapping manually.
Manifest Files
Optionally, you can choose to auto-map these columns by uploading a Manifest file. To upload a manifest file:
- Click the Upload mapping file in the upper-right of the mapping table.
- On the Upload mapping dialog box, upload your manifest file.
- Click Done.
If it is a fresh import, you can find the sample manifest file, which can be used as a reference point as you create an appropriate mapping file for your import. If you duplicate an existing import and upload a mapping file, you will find your existing mapping file already added, which can be downloaded. Your mappings will be auto-configured accordingly. For any additional attributes mentioned in the manifest file but not currently present in MoEngage, a modal will open up, which will list down the attributes for you to create the attributes.
Any columns with non-MoEngage attributes will be left blank, and you can either manually map them or create a new attribute for them. Make sure your manifest file follows the expected conventions, as mentioned.
Any additional columns present in your Manifest File but not in your file will be ignored. Also, if the mapping for an existing column is not present in the manifest file, MoEngage will keep the mapping blank so that you can manually configure it.
Make sure if a column in the manifest file is mapped to a non-existent MoEngage Attribute, then the mapping will be blank, and you will need to first manually create a new attribute from the UI and then map it.
| info |
Information Teams is not supported for custom segmentation. |
Portfolio Support
| info |
Information This feature allows you to route imported events from files stored inside your Amazon S3 bucket to specific projects within your MoEngage portfolio workspace using column mapping. |
Configuration Requirements
To route events to specific projects, configure the following in your import files and MoEngage mapping settings:
-
Map the project identifier column: In Step 2 (Import configuration and action) of your import configuration, map the CSV column or JSON key containing your project identifiers (for example, brand_name or app_id) to the MoEngage attribute
moe_project_name. - Ensure an exact match: The values contained in your mapped file column or key must exactly match the project names configured in your MoEngage portfolio. Matching is case-sensitive.
Event and User Ingestion Rules
MoEngage handles events based on the following logic:
-
Successful routing: If the value in the column or key mapped to
moe_project_namematches a configured project name in your portfolio, MoEngage ingests the user or event at that specific project level. -
Fallback behavior: If the
moe_project_namemapping is missing, blank, or does not exactly match a configured project name, MoEngage ingests the data at the global portfolio level.Note: Data ingested at the portfolio level is not associated with any specific project. This data is unusable for project-specific analysis, segmentation, or campaign targeting.
For more information, refer to Portfolio and Portfolio: Data Ingestion and Management.
| warning |
Limitations Project-level routing for S3 imports is available only for imports. The following features are managed strictly at the global portfolio level:
|
Send Import Notifications
To receive an email notification about the status of your imports, perform the following steps:
- Select the Send import status to check box.
-
In the Select email id list, select the email ID. You can select up to 10 emails to send the status emails to.
The import status email contains info about the following events:
- An import is created
- An import is successful
- An import has failed
- After completing all mappings, click Next
Step 3: Scheduling
In this step, you must define when to import files from your S3 bucket.
MoEngage supports the following types of imports:
- One time imports: You can run the import as soon as possible or at a later date and time (scheduled).
- Periodic: You can run your imports hourly, daily, weekly, or monthly, or with intervals and advanced configurations.
For each run, MoEngage will try to fetch a file with the configured DateTime format, so ensure your file names are configured properly. Optionally, you can specify whether the import should end after a specified set of occurrences or at a particular date. Click Done when ready.
| info |
Information The run history for file imports is available for only 07 days. |
Duplicate Imports
A duplicate import is considered when the:
- Users/ Events import types are the same.
- Event name/ Registered/ Anonymous/ All users import subtypes are the same.
- Event name/ Registered/Anonymous/All users import types with the same S3 folder path.
- Event name/ Registered/Anonymous/All users import types with the same Bucket name.
FAQ
Click the ellipsis on the right and click View to look up the Import details. Hover over the Failed Status to learn the reason.
By default, imports are not retried when there is a failure. You can, however, configure to receive an email alert upon failure.
In such cases, the new data can still be added to the archived segment, which you can then unarchive as needed.
In a scheduled run for a given workspace, MoEngage picks up all the new files identified in the S3/SFTP folder based on file name prefix and processes them. Data import in a given MoEngage workspace uniquely identifies these files by combining the folder location and the file name.
No. A file after processed is not be processed again if the file name remains the same and in the same folder location. However if the same file is also placed in a different folder location, a new data import setup in MoEngage with the new folder location configured can pick up the file.
No. Data imports in your MoEngage workspace dashboard have to be setup separately for User data and Event data, hence the files should either contain User attribute data or Event data.
After an import process starts, it can't be stopped midway. This is because the data goes through several steps, and interrupting it could lead to incomplete or inconsistent results. It's best to let the current import finish.
Yes, you can prevent future scheduled imports from running automatically. Find the import schedule and select the "Archive" option from the Actions menu on the Data Imports dashboard. This will prevent it from running at its next scheduled time.
If an import appears to be stuck or is taking longer than usual, it's best to wait. The system has checks in place to handle these situations automatically and retry if necessary. Manually starting the same import again while it's still processing can cause conflicts and may prevent the original import from completing successfully.
NDJSON (Newline-Delimited JSON) means each line in your .json file is a complete JSON object, separated by a new line. This format is required to process extensive JSON datasets line by line, allowing for scalable and robust imports.
.gz,.zip) supported?
No, MoEngage doesn’t support importing compressed files.
If you change the file type, the existing preview is removed, and the list of available files is re-fetched based on the new file type. You must select a File to Preview again and configure your mappings based on the new file's structure.